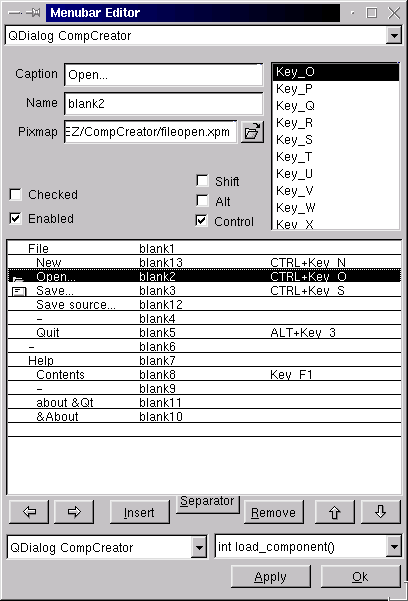
1) Menubar then "windows | menubar editor"
2) alt+m on a component
3) right click on the component of your choice, and select menubar editor
The Menubar editor is a little complex at first, but once gotten used to, will prove to be extremely usefull. You use the editor only on top level widgets (because they are the only ones with menubars). And as shown in a few demos you can have multiple dialogs, hence you can have multiple menubars.
The menubar has several different tools on it, the first you may use will be the top most combo box which will contain names of ALL top level dialogs available.

So select the top level dialog you want to put a menubar onto. Then you'll see that the white square (listbox) will have at least one entry. You can select any one of the entries and then all the other fields not discussed so far will help to make it a unique entry. If you select the lone blank entry at the bottom then a new blank one will pop in upon editing it. There is always at least one blank one. However you can select any entry and either hit the remove, or insert button (along the bottom) and these will remove the current item or insert a blank entry at the current selected entry respecivly.
Now that you know your way around the other widgets, let's explore the customization widgets. There are 12 of these (as seen from the screen shot). The most straight forward are the ones above the listbox, you can type in the caption that this menu item will have, then select it's name (so that paticular item may later be access in the Source Editor) Then finally you can select what buddies the item will have so that a key stroke , or strokes depending upon the alt, control, and shift modifiers, will act the same as just clicking on the item. You can also set whether defaultly the item is checked and/or enabled (meaning it can be selected). When all this is done you can then select the depth of the item (meaning how many menus a user will have to go through to get to the item). You do this with the < and > buttons. Moving to the right means the item will be deeper into the interface, and to the left easier to access. Now after doing this you'll see that the menubar you have customized will be on the top level dialog you select in the begining.
Now the third and final step arises, you must select what slot you wish to connect this to (discussed further in detail in the Signal & Slot page). You do this by selecting the object you wish to connect to on the left combo box on the bottom of the dialog, then in the right box will appear all the available slots to connect to, just select the one and it's saved, now all your work will be done and QtEZ can take over from there.
One note that can be made: for easy usage all popup's will have the name of the first element in the popup, and that item will be index 0, each item after that will be in ascending order.